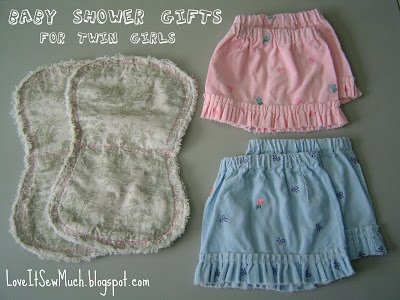
I love little babies in skirts, and I thought two matching sets would be sweet.
They have a cute ragged edge ruffle attached to the hem.
(I do not have a tutorial for these yet but look for it in the future...)
Also, who can ever have enough burping cloths?
I made a set of toile burping cloths stitched with pink flowers and a ragged edge finish.
Here's my tutorial for the Baby Burp Cloths:
You will need 1/2 yard of 45" wide fabric. You can fit 4 burp cloth shapes across one width of the fabric.
Cut out your burp cloth shapes, according to these measurements. They can be the same fabric or be two different fabrics for a reversible look. I went with the same toile on both sides.
Cut one layer of batting for each burp cloth. Layer it in between the front and back. Make sure right sides are facing out on both front and back.
Sew all three layers together, 1/2-inch from the cut edge. Sew all the way around the whole burp cloth.
Choose a decorative stitch from your sewing machine's decorative stitches. (Most machines have these cute little stitches. Some are just geometric shapes, but you may have flowers or leaves or the like. Do a test on a different fabric first to make sure you like it, and that it keeps repeating if you sew continually.) Sew this decorative stitch across the narrow part of the burp cloth (you know - right across the middle).
Do the same decorative stitch all the way around the edge. When you sew this design around the curved edge, just steer your fabric and follow your curve. Line it up about 1/2-inch from your first straight-stitched edge.
I chose one tulip design and one daisy design.
I had a soft pink on the top thread and a bright pink in the bobbin thread, just for fun.
Trim the layer of batting in between the layers just to the inside edge of the straight stitching line.
Then using sharp scissors, clip every 1/8-inch to 1/4-inch right up to, but NOT THROUGH, the straight stitch. Do this all the way around the whole burp cloth.
Now go throw it in the washer and fluff it up in the dryer. This step may have to be repeated a few times to get all the fluff lint to a minimum.
And VOILA! YOu have your sweet ragged edge.
Aren't these burp cloths cute?
Make a bunch and always have them ready for baby showers or new moms!
Aren't baby showers great? What kind of gifts do you like to give?
I am linked up to:
~If you are interested in receiving updates and future posts from this blog, please sign up to "FOLLOW" on the top right of this page. Let's keep in touch!~


